
16 July 2024
GTM zones

In summary
- Zones is a feature of Google Tag Manager 360 that allows you to give access to colleagues or external teams to Google Tag Manager and limit that access
- If you’re a large organisation with many teams requiring access to your tag manager, Zone may be the thing for you
- Understand the typical use cases for Zone and how to set it up
Why would you need Zones in Tag Manager?
If you’ve ever felt nervous about providing Google Tag Manager access to another team or external agency, Zones is the feature you’ve been dreaming of!
Large organisations have a constant stream of requests to implement various types of tracking. Sharing the tagging workload requires giving more people access to GMT. However, providing access has previously required a very high level of trust. Tag Manager 360 Zones now allows tagging teams to work independently, while significantly limiting the risk.
What are Zones in Google Tag Manager?
Zones is a feature of Google Tag Manager 360 (GTM) that allows you to give limited GTM access to colleagues or external teams. This means you can limit your risk when providing access to other teams.
For our technical readers, a zone is an additional Tag Manager container linked to your main container which fires with the main container on your website. It’s like having multiple GTM containers on your site, except they share the same dataLayer, container ID and you have more control over what is deployed in them. We’ll explain configuration options in more detail below.
What are the benefits of using Zones?
Benefits of Tag Manager 360 Zones include:
- Improved governance options for GTM where you can provide restricted access for internal and external teams
- Allowing other teams to add and maintain tags without having access to the main container
- Limiting tagging access to particular sections of your site
- Limiting potential security risks associated with using custom tags
What situations can Zones help with?
Some use cases for Zones include:
- Agency access: If you need help from an agency, but don’t want to risk them interfering with the existing tagging set up. You can give them access to a Zone that limits the area of the site that they’re working on. You can also limit the type of tags to appropriate, low risk tags.
- Marketing team access: If your marketing team want to maintain their own tags they can be given access to the landing pages and conversions they need to track. Tag types can also be limited to approved tags required for tracking marketing conversions.
- Tagging across multiple sites: To maintain consistent tagging across multiple websites there needs to be a balance control and flexibility in tagging governance. Zones allow a core set of tags to be maintained by the central team, while also providing access for additional tagging to accomodate and tech and business idosyncracies of different sites.
The limitations of Zones
- Only available for Tag Manager 360 customers: Those on the free tier won’t have access to this feature, as Zones are only available to Tag Manager 360 customers. Tag Manager 360 is included in the Google Analytics 360 product. So for existing Google Analytics 360 customers it’s a no-brainer to make use of this feature.
- Variables and Triggers not shared: Zone containers don’t have access to variables and triggers in the main container. Any variables and triggers required by tags in the Zones container will have to be duplicated.
- Additional complexity for tags that need to fire in a specific order: Some tags need to fire in a specific order to function correctly. When tags that rely on each other are in separate containers it can be more complex to troubleshoot and control firing order.
- Workflow and governance need to be carefully considered: Zones are technically easy to set up, but before you start you need to be clear about what workflow issues you are hoping to solve. If you rush in without thinking through your use cases you risk adding complexity for little productivity gain. If proper quality assurance isn’t in place teams might introduce inconsistent naming conventions, or inadvertently fire a duplicate event. It’s worth taking a little time to think through specific use cases with specific teams in mind to make sure your set up best for your situation.
How to set up GTM Zones
There are five main steps to setting up zone in Google Tag Manager.
- Creating a new container for the Zone
- Publishing the new container for the Zone
- Creating a Zone in the main container and link to new container
- Configuring the Zone to limit risk
- Testing the Zone
Let’s get stuck into it.
1. Create a new container for the Zone
- Go to GTM account where the main GTM container sits
- Click Create the 3 dots next to the cog icon to see menu options, then click ‘Create container’

- Name the new GTM container (this will be the container you link to from the Zone you will add in the main container)
Tip: Name it same as the main container with added info about the purpose of the Zone. So if the Zone is being set up to allow agency access you could call it ‘WebsiteName [Marketing Zone]’ - Select the target platform for the container (Web/iOS/Android/AMP/Server)
- Click ‘Create’ to create the container

2. Publish a new container for the Zone
- Add a variable or trigger so you can publish the new container
- Publish the container
- Give users Edit or Publish access to the new container (as appropriate for their role).
3. Create a Zone in the main container and link to new container
- Go to the main GTM container
- Click ‘Zones’ in the right side nav

- Click the ‘New’ button

-
Name the Zone
Tip: We recommend naming the zone the same thing you added to the end of the new container name. So if the new container is called ‘WebsiteName [Marketing Zone]’, call the Zone ‘Marketing Zone’. -
Click the ‘+’ in the Zone Configuration panel

-
Click the ‘+’ icon on the Container ID field


- Choose the new container you just created.
Note: Don’t link the container to itself, which is also listed as one of the options.

- Click the ‘Add’ button

4. Configuring the Zone to limit risk
Zone Configuration allows you to limit the risk of GTM access. There are two main ways to control tagging in the Zone:
- Configuring Zone boundaries limits where tags are allowed to fire
- Restricting types of tags, triggers and variables permitted in the Zone
Continue reading for more details about these configuration options.
Configuring Boundaries
Boundaries limit tags to a section of a website (or other conditions). In the example below we’ve limited tagging activity to the ‘/special-offers’ section of the website.

Restrict types of tags, triggers and variables
Type restrictions allow you to restrict which tags fire in your zone, giving you more control and increasing security.
Types of tags, triggers and variables should be limited to the most minimal options that will allow the team to complete their tagging tasks. It’s easy to add types in later, so we recommend keeping it locked down.
Review types in each section:
- Google tag types
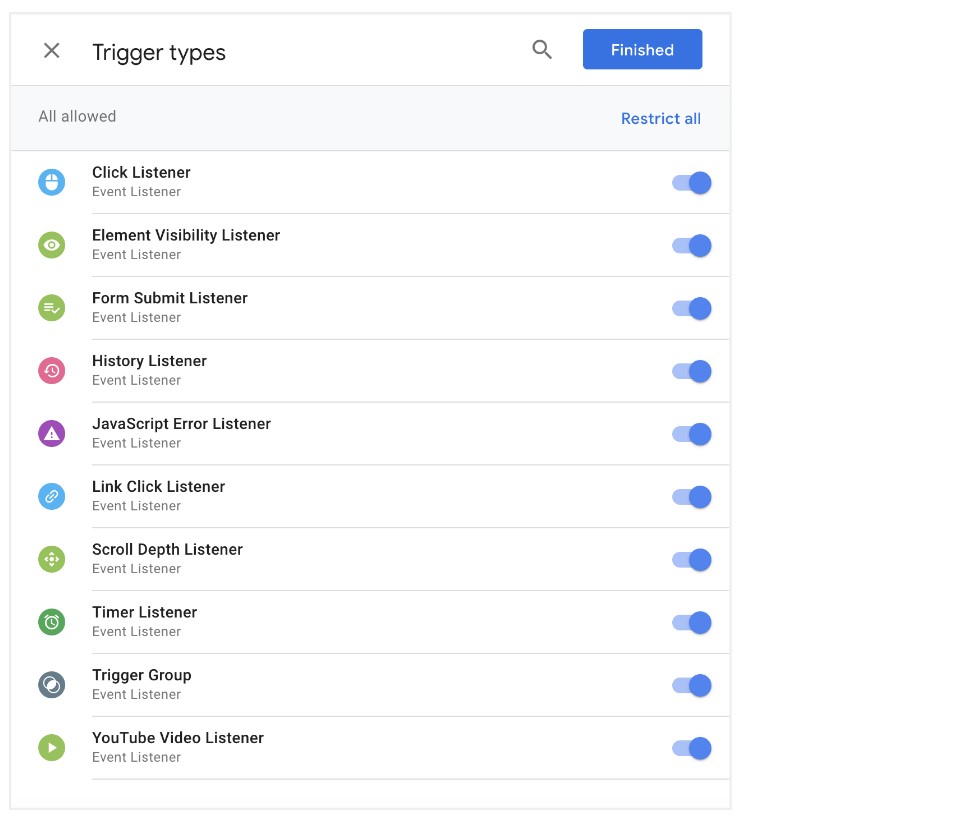
- Trigger types
- Variable types
- Non-Google tag types
- Limit Google tag types
We recommend limiting to a few tag types that are required by the team. We also highly recommend disabling the Custom HTML tag option, as that is high risk.

-
Limit Trigger types
-
Limit Variable types
Note: Custom JavaScript is disabled by default and should not be enabled for teams without a high degree of technical knowledge.


- Allow non-Google tags
If teams require access to non-Google tags, pixels or script types, this can be enabled in the non-Google types config section.

- Click the ‘Save’ button Note: Configurations can be changed in future if needed.

5. Testing the Zone
Before giving access to other users you should create a new user and provide access to the Zone container only. Log in as this new user to test the Zone to ensure that no tagging is permitted outside the specified Boundary. You can also check to see that only the authorised tags, variables and triggers are available to the Zone user.
Need help navigating Zones in Google Tag Manager?
Get in touch with Louder if you would like advice and support to set up Tag Manager 360 Zones for your teams.

About
Annette Loudon
Annette is an analytics consultant. Outside of work she enjoys dancing, singing and spending time with her favourite people.